Wednesday, 26 August 2015

One Sideboard, Two Projects

We picked up this sideboard with excellent old coloured glass doors and not very excellent anything else. All of the handles were mismatched, the back piece was not fixed onto the base properly and the varnish was old and wearing off in places. 


In progress, painting the base, staining the top

She looks a lot prettier in this photo than what she was - photos can be deceiving, this was the purchasers photo


We decided to remove the back piece altogether but that left a gap at the back. Step in handy hubby, he took an old mirror strut we no longer required and cut it to size and fitted it to the back. I loved the old wood and sanded it all back to bare wood on the top.


One seriously shiny top


The top ended up with two coats of dark stain and a vintage wax top coat. The base was Vintage Paint in Bone China, a grey based white as I wanted to really make a feature of the gorgeous blue glass in the doors. I distressed her as she had a naturally timeworn look already and finished the body with vintage wax.


Original Hardware

The top piece is going to make me the perfect sign for the Gallery, the mirror is being made into a blackboard, the wood is being painted in Retro Blue ( my fav colour!) vintage paint and a stencil will go either side, more on that when it's finished.


Work in Progress for this sign


Sunday, 23 August 2015

Milk Can Up-cycle Project


I knew this  painting and up-cycling lark was catching and now I have proof!
Above is the Before of one of two milk cans that we ( hubby and myself) found at a local garage sale. They had been sitting at someones farm for years filled with water. Totally rusted out and horrible, but still distinctive.

And here is the After... 


I had them at our front door and hubby thought they would not last much longer, so he had painted them with special rust stop liquid and then black enamel paint so it stops the rusting and they can continue to decorate the front of the Villa. This was all his idea and his project.  There's proof that painting is catching, his very own up-cycling project. I think he did a great job and you will see a lot  more of these featuring as props in upcoming photos.


Monday, 10 August 2015

Stenciling Tip No. 2


This is a simple one but will improve the look of your finished stencil project. 
  • Remove your stencil before your paint dries
After you have painted two very light coats of paint one straight after the other, remove your stencil straight away. This will give a nice clean edge to your stencil and ensure no sneaky excess paint creeps under your stencil while it dries. It also has the added bonus of the stencil coming away from your piece easily and not getting accidentally glued onto your piece by paint.


This is the second in my mini series of stenciling tips, I hope these are helpful, see the first one here Stencil Tip No. 1


Thursday, 6 August 2015

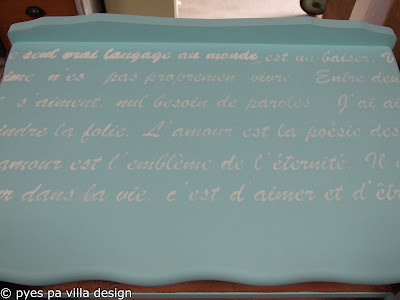
French Script Stencil AND Retro Blue Vintage Paint


First Time Use - French Script stencil


Always on the hunt for Queen Anne style furniture I picked this piece up a while ago but never re-furbed it. I must have had a plan! I finally kept a French script stencil for myself and wanted to do a retro but feminine look on this tallboy.

The stencil was tricky on the top, and I had a few mishaps, but nailed it in the end

Tricky to get this on the top, but worth the fiddly work

Retro Blue in Voodoo Molly Vintage paint is my favorite colour, so it had to be painted in this. I used a good quality synthetic flat edge brush, two coats with a quick sand in between coats to keep it a smooth finish. 


No distressing ( unheard of on my pieces) and finished in a light coat of poly. This completes the look, I hope you like it


Poor Sad Before


Sunday, 2 August 2015

Best Furniture Stenciling Tip


Have you ever started a furniture stencil job which look like this?

Good furniture stenciling comes with practice as with most things. And we all make mistakes or aren't sure how to start things. I have had clients email me to say their stencil bleeds and is no good, but a stencil looks like this for one reason, too much paint on the brush or roller.

You can see further down the picture that the stencil looks slightly better and that's because the roller has used up some of it's paint. 

So my tip is:
Less is More. 

Put a very small amount of paint on a plastic plate, dip your brush or roller into it and then wipe the paint off on a rag or clean part of the plate. Then stencil. It will feel like you aren't making much impact but when you pull your stencil away you will see that you have a clean stencil image. Give it a go, it will work much better

Stencil improves as the paint is being used up on the brush


Voodoo Molly Vintage Duck Egg & Antique White Desk


We have been playing around a lot with the new vintage paint that we are stocking from Voodoo Molly.


When I found this old unloved desk in an Op Shop I already had visions of it as a two tone unit. After much sanding  as it had very old loose varnish I applied Vintage paint in Duck Egg to the carcass and Antique White to the drawers. 


A tiny bit of distressing and antiquing and then two coats of vintage semi gloss poly finished her off. The knobs are all original, just cleaned and painted in a black - silver. Even the teenagers thought she was beautiful in the end. I love a happy ending!